Petite Vanilla Bean Scones

For years I didn’t know what I was missing. I never really had a desire to make scones, and now these days it seems like I can’t get enough! It all started with my favorite Glazed Cinnamon Scones (and if you can’t tell, I sorta have a thing for anything with a glaze on it as well!) and now I have about 50 different scone recipes pinned to my pinterest board that I’m anxious to try.  Scones are just so easy to make, they’re pretty much fail proof, they look pretty and are downright tasty. These right here are a close contender for the favorite spot.  So perfectly soft and flaky, not overly sweet and the hint of vanilla is refreshing and delicious. I mean, I was hooked the minute I smelled that vanilla pod. I know vanilla beans can be pricey, but it’s so worth the splurge, even if just for the smell that fills your kitchen!

Vanilla Bean Scones
Preheat oven to 400 degrees. Line a baking sheet with parchment paper or a silicone liner. In a large bowl whisk together flour, sugar, baking powder and salt, set aside. In a separate small bowl, whisk together 3/4 cup heavy cream, egg, vanilla bean seeds and vanilla extract until well combined, chill in refrigerator until ready to use. To remove seeds, split pod open and use the back of the knife to scrape out the seeds.

Vanilla Bean Scones

Add grated butter to flour mixture and mix evenly into flour using a pastry cutter or fork until it resembles coarse meal. Add cream mixture to flour mixture and stir until it just combined, then knead mixture  several times until it has come together well (it will be slightly sticky, but this is what makes the scones moist). Pour mixture onto a floured surface and shape into a 7 by 7-inch square. Cut into 9 equal squares, then cut each square in half on a diagonal to create two triangles.

Vanilla Bean Scones
Transfer to prepared baking sheet spacing scones evenly apart, and brush tops with remaining 1 Tbsp cream.

Vanilla Bean Scones
Bake 13 – 14 minutes until lightly golden. For the glaze, whisk together powdered sugar cream, milk, vanilla beans and vanilla extract until smooth. Cool baked scones on a wire rack then spoon vanilla glaze over tops.

Vanilla Bean Scones

Vanilla Bean Scones

Vanilla Bean Scones

Scones:
2 cups all-purpose flour
6 Tbsp granulated sugar
1 Tbsp baking powder
1/2 tsp salt
2/3 cup + 1 Tbsp heavy cream, divided
1 large egg
Seeds of 1 small vanilla bean
1/2 tsp vanilla extract
6 Tbsp unsalted butter, cold and grated

Glaze:
1 cup  powdered sugar
1 1/2 Tbsp heavy cream
1 1/2 Tbsp milk
Seeds of 1 small vanilla bean
1/2 tsp vanilla extract
Directions

Preheat oven to 400 degrees. Line a baking sheet with parchment paper or a silicone liner. In a large bowl whisk together flour, sugar, baking powder and salt, set aside. In a separate small bowl, whisk together 3/4 cup heavy cream, egg, vanilla bean seeds (split pod open and use the back of the knife to scrape out seeds) and vanilla extract until well combined, chill in refrigerator until ready to use. Add grated butter to flour mixture and mix evenly into flour using a pastry cutter or fork until it resembles coarse meal. Add cream mixture to flour mixture and stir until it just combined, then knead mixture  several times until it has come together well (it will be slightly sticky, but this is what makes the scones moist). Pour mixture onto a floured surface and shape into a 7 by 7-inch square. Cut into 9 equal squares, then cut each square in half on a diagonal to create two triangles. Transfer to prepared baking sheet spacing scones evenly apart, and brush tops with remaining 1 Tbsp cream. Bake 13 – 14 minutes until lightly golden. For the glaze, whisk together powdered sugar cream, milk, vanilla beans and vanilla extract until smooth. Cool baked scones on a wire rack then spoon vanilla glaze over tops.

Source | Cooking Classy

Vanilla Bean Scones

Chocolate Crepes

I am sitting here speechless, wondering where these have been all my life. We love chocolate, and we love crepes with the best of ’em, so I don’t know why I never thought to make these before. When I came across this recipe I knew I HAD to have it in my life. And believe me, it did not disappoint! It’s every bit as delicious as you can imagine a chocolate crepe with fresh fruit and cream would be! It earned me a huge hug from my 10 year old, and he’s normally not the hugging type, so I’ll gladly take it.

Chocolate Crepes

Add all ingredients to a large bowl and beat until smooth, or blend everything together in a blender. Cover and chill for 30 minutes. Lightly grease a skillet and heat over medium-high heat. Pour about 1/4 cup batter into the pan, lift and tilt the pan until the bottom is evenly covered with a thin coat of batter.

Chocolate Crepes
Cook for 1-2 minutes or until it begins to bubble

Chocolate Crepes
flip and cook for another 20-30 seconds. Remove to a plate and continue with the rest of the batter.

Chocolate Crepes

Serve with freshly whipped cream and sliced bananas, or other fresh fruit.

Chocolate Crepes

Chocolate Crepes

Chocolate Crepes

2 eggs
1 1/2 cups milk
1/2 tsp vanilla
1 1/4 cups flour
1/4 cup HERSHEY’S Cocoa powder
1/4 cups sugar
1/4 tsp salt

Add all ingredients to a large bowl and beat until smooth, or blend everything together in a blender. Cover and chill for 30 minutes. Lightly grease a skillet and heat over medium-high heat. Pour about 1/4 cup batter into the pan, lift and tilt the pan until the bottom is evenly covered with a thin coat of batter.  Cook for 1-2 minutes or until it begins to bubble, flip and cook for another 20-30 seconds. Remove to a plate and continue with the rest of the batter. Serve with freshly whipped cream and sliced bananas, or other fresh fruit.

Source | Sweet Treats & More

Chocolate Crepes

Blueberry Lemon Chia Pudding {confessions of a chia convert)

Lemon Blueberry Chia Pudding
Every where I look, it’s chia. I know it’s the new craze and I can’t tell you how many chia pudding recipes I have pinned to my pinterest board. They always look so tantalizing with their fresh fruit and summery hues, but I just couldn’t bring myself to eat something that produced grass hair on a ’90’s novelty item. Maybe it’s different types of seeds, who knows, but it was enough to keep me from jumping on the bandwagon and taking the plunge. However, when my sister posted this recipe on her website with rave reviews, and even labeling it as kid friendly, I knew I could take her word for it. And I’m so glad I did! It really is as fresh and delicious as it looks and the nutrition factor is just an added bonus. My kids were a split decision. The ones who have texture issues weren’t too big of fans, but the rest of us loved it. I see a bright future of chia pudding breakfasts and snacks in our future! And I’m pretty confident we won’t even be sprouting grass like a chia pet. Now if only I could get on board with cooking with lavender, it sounds enticing, but there’s just something about food made with flowers….

Blueberry Lemon Chia Pudding

Blueberry Lemon Chia Pudding

1 cup Greek yogurt, plain
1 cup coconut milk
1 tbsp Lemon peel
2 TBS lemon juice
1 cup blueberries (fresh or frozen)
1 1/2 TBS Honey
1/4 cup Chia seeds
additional berries and honey to top each serving

Combine all ingredients in a large storage container that has a lid. Make sure all the chia seeds are mixed in, and mash the berries lightly, especially if using frozen raspberries. Place the lid on the container and refrigerate overnight or for at least 8 hours. Serve with extra raspberries (or other berries of choice), and a drizzle of honey if desired.

Source | Six Little Chefs

Blueberry Lemon Chia Pudding

{decadent} Dark Chocolate & Nutella Banana Bread

I have yet to meet a banana bread recipe that I don’t just looooove. But this right here takes the banana bread up a notch. It’s taking the banana bread scene by storm. It’s stepping up it’s game. It’s bringing a more sophisticated look to the face of banana bread. I mean, we’re talking chocolate on chocolate here. Chunks of dark chocolate and swirls of warm melted Nutella make this banana bread the best you’ll ever have!

{decadent} Dark Chocolate & Nutella Banana Bread

Preheat your oven to 350 F. Grease and/or line a medium size loaf tin and set aside. In a medium bowl, mash your bananas well and whisk together with the eggs and melted butter. In a separate large bowl, whisk the flour, sugar, baking soda, salt and cinnamon. Pour the wet ingredients into the dry and mix with a wooden spoon until just combined. Roughly chop the chocolate bar, then stir in the chocolate chunks.

{decadent} Dark Chocolate & Nutella Banana Bread
Microwave the Nutella for 30 seconds until soft. Pour into the mixture and use a wooden spoon to swirl into the batter.

{decadent} Dark Chocolate & Nutella Banana Bread

{decadent} Dark Chocolate & Nutella Banana Bread
Transfer to the loaf tin and sprinkle lightly with brown sugar.

{decadent} Dark Chocolate & Nutella Banana Bread
Bake on the middle shelf for 50-55 minutes, or until a toothpick comes out clean. Leave to cool before turning out of the pan.

{decadent} Dark Chocolate & Nutella Banana Bread

{decadent} Dark Chocolate & Nutella Banana Bread

1 3/4 cups all purpose flour
3/4 cups brown sugar, packed
3/4 teaspoon baking soda
pinch of sea salt
1 teaspoon ground cinnamon
4 medium size ripe bananas
2 large eggs
6 Tbs butter, melted
1/3 cup Nutella or any other chocolate hazlenut spread
1 (4 oz) dark chocolate bar, cut into chunks (you can use milk chocolate, if you prefer)
Brown sugar, for sprinkling

Preheat your oven to 350 F. Grease and/or line a medium size loaf tin and set aside. In a medium bowl, mash your bananas well and whisk together with the eggs and melted butter. In a separate large bowl, whisk the flour, sugar, baking soda, salt and cinnamon. Pour the wet ingredients into the dry and mix with a wooden spoon until just combined. Roughly chop the chocolate bar, then stir in the chocolate chunks. Microwave the Nutella for 30 seconds until soft. Pour into the mixture and use a wooden spoon to swirl into the batter. Transfer to the loaf tin and sprinkle lightly with brown sugar. Bake on the middle shelf for 50-55 minutes, or until a toothpick comes out clean. Leave to cool before turning out of the pan.

Source | adapted from The Cake Hunter

{decadent} Dark Chocolate & Nutella Banana Bread

Glazed Lemon Poppy Seed Bread

Glazed Lemon Poppy Seed Bread
If you like moist poppy seed bread with a hint of citrus and a rich creamy lemon glaze, then this is the recipe for you! Because I know you were craving that specific thing right at this moment. And if you weren’t then now you are. This bread is so delicious, that it really should qualify as a dessert. But I called it a bread mostly to justify making it for my kids for an after school snack. And then eating it again for breakfast. But hey, if you check out the ingredients, it’s rather healthy (er, healthier) with whole wheat flour, greek yogurt, egg whites, low fat milk and no butter. So enjoy! Also perfect for a brunch or luncheon, and pretty enough to be packaged up and given as a gift to neighbors, teachers, visiting teachers, or that friend who volunteered to watch your kids when you needed a break. Those are the best kind of friends, and this is definitely a worthy thank you gift. Just saying….

Glazed Lemon Poppy Seed Bread

Glazed Lemon Poppy Seed Bread

Glazed Lemon Poppy Seed Bread

1½ cups white whole wheat flour
2 teaspoons baking powder
¼ teaspoon salt
¾ cup sugar
Finely grated zest of 1 lemon
½ cup Greek yogurt (plain or vanilla)
¼ cup lowfat milk
¼ cup extra-virgin olive oil
½ teaspoon pure vanilla extract
2 large egg whites
1 large egg
1 Tablespoon poppy seeds
Lemon Glaze:
1½ cups powdered sugar
1 1/2 Tablespoons Lemon Juice
3 Tablespoons heavy cream

Preheat the oven to 350 degrees. Spray a loaf pan (8½ by 4½) with cooking spray and set aside. In a medium bowl whisk together the flour, baking powder, and salt. In a separate bowl mix sugar and lemon zest, then add greek yogurt, milk, olive oil, vanilla, egg, egg whites and poppy seeds. Whisk vigorously until well blended, then add to the flour mixture and stir until just incorporated (don’t over mix). Pour into the prepared pan and bake for 45-50 minutes or until toothpick entered in center comes out clean. Let cool to room temperature before turning out and removing from pan. To make the lemon glaze: In a small bowl, whisk together powdered sugar, lemon juice, and cream (can thin out with a little milk if too thick). Pour over the top of the bread, then slice and serve.

Source | The Recipe Critic

Glazed Lemon Poppy Seed Bread

{mother’s day brunch} Feta, Tomato and Spinach Omelet

Mother’s Day is around the corner and I’m missing my mama. It’s been 11 years since we’ve even lived in the same state together, but being on the other side of the world is even harder. I wish I lived close enough to invite her over for a Mother’s Day brunch. And if I could, this is what I would make. These incredible omelets, with some muffins and fresh fruit on the side. This savory omelet is filled with fresh and flavorful ingredients (feta, tomato, spinach and avocado are the perfect combination, if you ask me) to create a delicious and beautiful dish fit for your queen. Hopefully one of these days I’ll get the chance to make this for her, but until then I may be requesting my husband to make this for my own Mother’s Day brunch ;).  Omelets always seemed so intimidating, but the good news is that they aren’t. Speed is the key when it comes to making them, which also means that a delicious breakfast will be on the plate in under 5 minutes, you can’t beat that. It has taken me a few trial and errors to get it right, and I still occasional turn a failed omelet into scrambled eggs, but once you get the hang of it, it really is quite simple. And the results are divine.

Feta, Tomato and Spinach Omelet + step by step instructions for making the perfect French Omelet

Heat skillet over medium heat, add 1 Tbs butter and swirl to evenly coat skillet

Feta, Tomato and Spinach Omelet + step by step instructions for making the perfect French Omelet

Crack two eggs into the pan, then working quickly add half and half and whisk together. Don’t over beat, you don’t want to have scrambled eggs,  mix until just combined

Feta, Tomato and Spinach Omelet + step by step instructions for making the perfect French Omelet

lift and tilt skillet until eggs are spread into a thin layer (like you would when making crepes)

IMG_9201

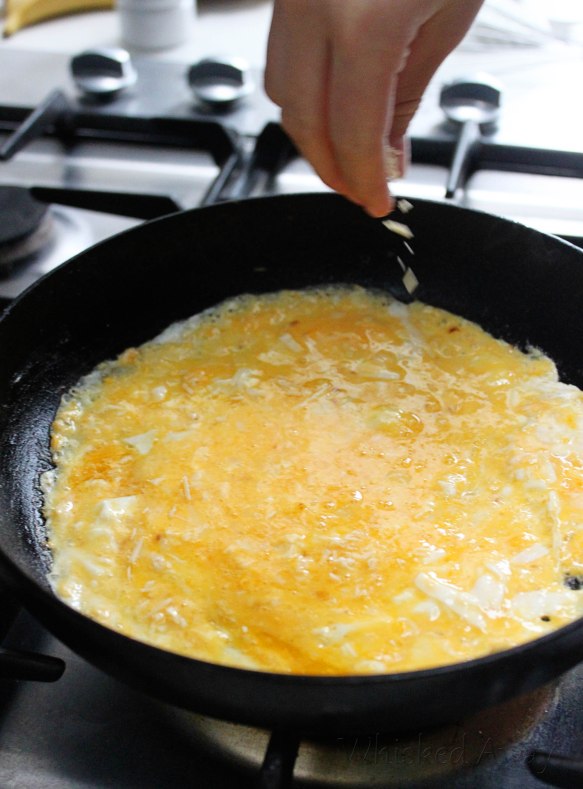
Sprinkle with parmesan cheese, and dash of salt and pepper

Feta, Tomato and Spinach Omelet + step by step instructions for making the perfect French Omelet

Feta, Tomato and Spinach Omelet + step by step instructions for making the perfect French Omelet

Lift edges to loosen and once the underside is lightly browned (don’t over cook, although I tend to like mine that way), gently flip.

IMG_9193

This is where I’m taking some creative control. A real french omelet is only cooked on one side then removed while the center is still creamy. I prefer my eggs to be cooked a little longer, so I flip it over and let it cook while I add the filling, but if you prefer it the other way, just remove it to the plate before adding the filling. Cover one half with tomato, avocado, feta and spinach

Feta, Tomato and Spinach Omelet

fold in half and transfer to a plate for serving

Feta, Tomato and Spinach Omelet + step by step instructions for making the perfect French Omelet

Feta, Tomato and Spinach Omelet + step by step instructions for making the perfect French Omelet

*makes one omelet

2 Eggs
1 Tbs butter
1 Tbs Half and half
1 Tbs shredded Parmesan cheese
Salt and pepper, to taste

Filling: diced tomato, diced avocado, crumbled feta cheese, chopped baby spinach leaves

Heat skillet over medium heat, add 1 Tbs butter and swirl to evenly coat skillet. Crack two eggs into the pan, then working quickly add half and half and whisk together. Don’t over beat, you don’t want to have scrambled eggs, mix just until combined then lift and tilt skillet until eggs are spread into a thin layer (like you would when making crepes). Sprinkle with parmesan cheese, and dash of salt and pepper. Lift edges to loosen and once the underside is lightly browned (don’t overcook), gently flip. (This is where I’m taking some creative control. A real french omelet is only cooked on one side then removed while the center is still creamy. I prefer my eggs to be cooked a little longer, so I flip it over and let it cook while I add the filling, but if you prefer it the other way, just remove it to the plate before adding the filling). Add filling ingredients to one half of the omelet then fold in half and transfer to a plate for serving.

Source | Cooking Light

Also shared at:
Fiesta Friday link up party
What’d you do this weekend
Tell ’em Tuesday

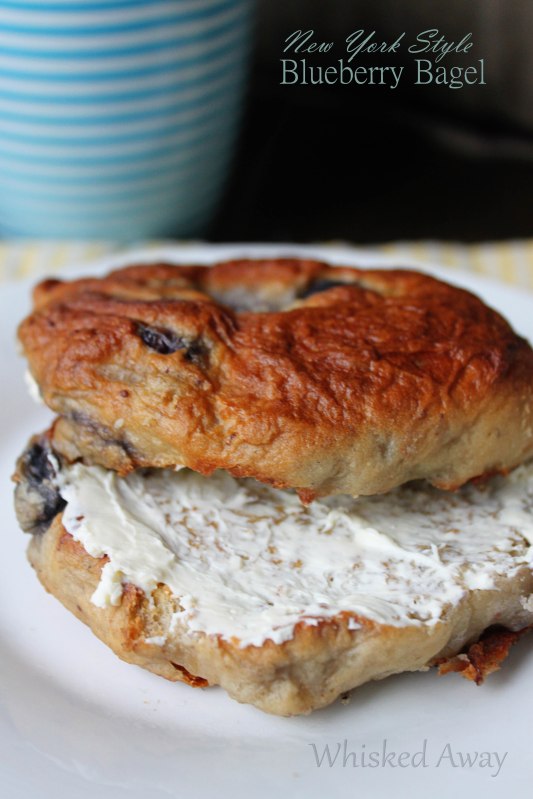
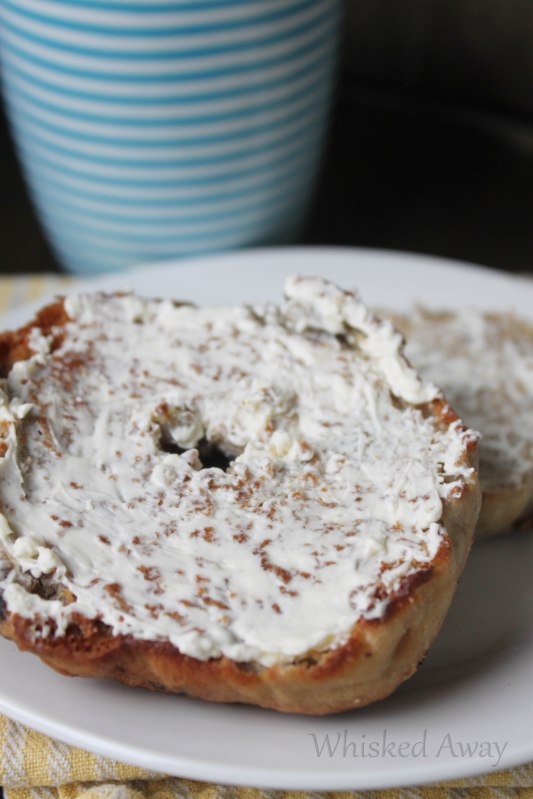
New York Style Blueberry Bagel

It seems like we got a little ripped off in the Fall department. Those crisp sunny autumn days have quickly turned into cold, wet , dreary winter days. But days like that aren’t so bad when you have no where to go and are left with the luxury of lounging around in your pajamas in front of the fire all day. Last Saturday was just that sort of day and I woke up with a craving for bagels and hot chocolate. Instead of bundling up and heading out to buy bagels (which there really are no bagel shops here anyways), I opted for this homemade version instead. It takes a little longer, but you really can’t beat a warm fresh bagel hot out of the oven smothered in cream cheese. Even if it’s spring on your side of the world, swap out the hot cocoa for a side of fresh fruit and you’re good to go!

New York Style Blueberry Bagel
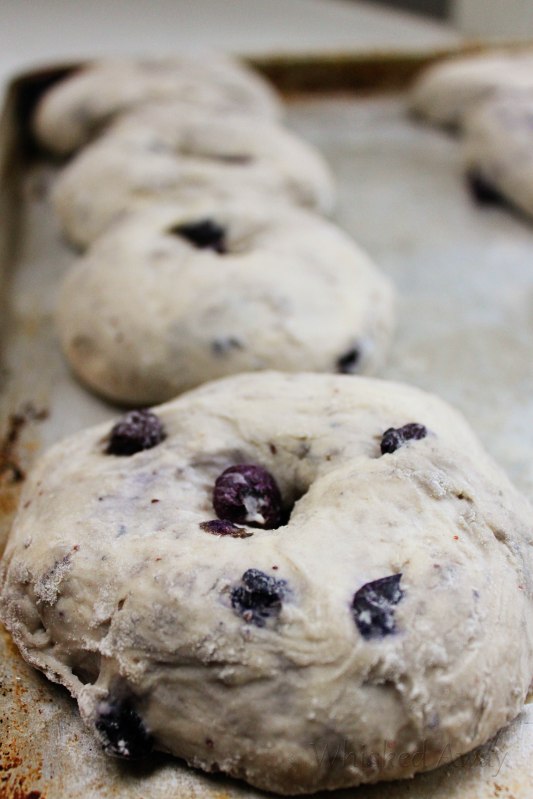
Dissolve the yeast and sugar in 1/2 cup of warm water then set aside for 5-7 minutes to proof. In a large bowl, mix together the salt and flour then gradually stir in the yeast mixture and remaining 3/4 cups water. Toss the blueberries in 1/4 cup flour then gently fold in and knead until you have a soft and elastic dough (either by hand or using the dough hook of a stand mixer. The berries will start to get mushed into the dough and it will turn purple. Cover the dough and let rise until doubled, about 1 1/2 hours. Divide the dough into 8 balls, make a hole in the center of each then stretch and form into a bagel shape. Let rest for 30 minutes.

New York Style Blueberry Bagel
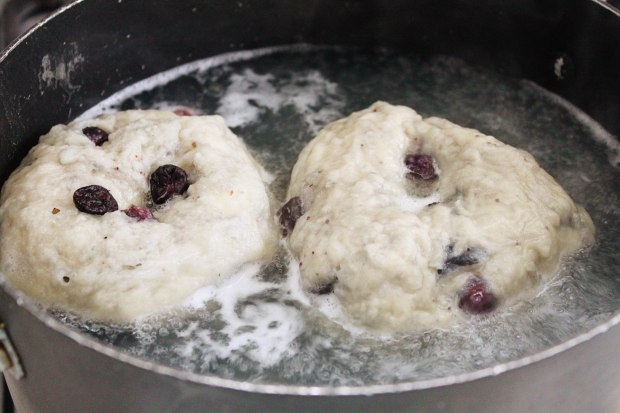
Pre-heat oven 425. Bring a large pot of water to a boil then boil the bagels, 2 or 3 at a time, for 5-6 minutes until they have firmed up a little and aren’t so doughy (this is what gives it a soft and chewy center).

New York Style Blueberry Bagel
Remove from pan and allow excess water to drip off (can blot with a paper towel as well). Place on a lightly greased baking sheet and bake 20 minutes, or until lightly browned. Cut the bagels in half and toast, then spread with cream cheese and/or jam.

New York Style Blueberry Bagel
2 Tbs active dry yeast
2 Tbsp sugar
1 1/4 cups of warm water
3 1/2 cups flour + 1/4 cup, divided
1 1/2 tsp salt
1 cup blueberries

Dissolve the yeast and sugar in 1/2 cup of warm water then set aside for 5-7 minutes to proof. In a large bowl, mix together the salt and flour then gradually stir in the yeast mixture and remaining 3/4 cups water. Toss the blueberries in 1/4 cup flour then gently fold in and knead until you have a soft and elastic dough (either by hand or using the dough hook of a stand mixer. The berries will start to get mushed into the dough and it will turn purple. Cover the dough and let rise until doubled, about 1 1/2 hours. Divide the dough into 8 balls, make a hole in the center of each then stretch and form into a bagel shape. Let rest for 30 minutes. Pre-heat oven 425. Bring a large pot of water to a boil then boil the bagels, 2 or 3 at a time, for 5-6 minutes until they have firmed up a little and aren’t so doughy (this is what gives it a soft and chewy center). Remove from pan and allow excess water to drip off (can blot with a paper towel as well). Place on a lightly greased baking sheet and bake 20 minutes, or until lightly browned. Cut the bagels in half and toast, then spread with cream cheese and/or jam.

Source | Heather’s French Press

Also shared at:
Fiesta Friday link up party
What’d you do this weekend
Tell ’em Tuesday

{flashback Friday} Glazed Apple Crumb Muffins

My kids love when I make these for breakfast or an after school snack. They think they’re cupcakes. They taste just as good as a cupcake, but I’d like to think the apples make them a little healthier (the rich vanilla cream glaze isn’t doing much to help my case, is it?). My daughter isn’t a huge fan of desserts or breads with apples in it (she did not get that from me!), so the first time I made these she didn’t even try them. I snuck one into her lunch and she came home and confessed that she loved it.  I’m slowly changing her mind, one warm moist apple muffin at a time (drenched in glaze, of course :).

Glazed Apple Crumb Muffins
First, make the crumb topping. In a medium bowl, combine both sugars, the cinnamon, and melted butter then stir in the flour. Set aside. Preheat oven to 425 degrees. Line a muffin tin with paper liners. Prepare apples by coring, peeling and dicing into bite sized pieces.

Glazed Apple Crumb Muffins
In a medium bowl beat the butter on high speed until smooth and creamy, about 1 minute. Add the brown sugar and granulated sugar and beat on high until creamed, about 2 minutes. Add the eggs, yogurt, and vanilla extract and mix well. In a large bowl, toss together the flour, baking soda, baking powder, cinnamon, and salt. Pour the wet ingredients into the dry ingredients and slowly whisk together. Add the milk, gently whisking. Fold in the apples. Fill muffin tins 3/4 full with batter then sprinkle with crumbs (crumble it with your hands to make some big chunks).

Glazed Apple Crumb Muffins
Bake at 425 for 5 minutes, then reduce heat to 350 and continue baking for an additional 10-15 minutes, or until lightly browned.

Glazed Apple Crumb Muffins
To make the glaze, whisk all of the glaze ingredients together and drizzle over warm muffins.

Glazed Apple Crumb Muffins

Glazed Apple Crumb Muffins

Crumb topping:
2/3 cup brown sugar
2 Tablespoon sugar
2 teaspoon cinnamon
1/2 cup butter, softened
2/3 cup flour

Muffins:
1/2 cup butter, softened
1/2 cup brown sugar
1/4 cup sugar
2 large eggs
1/2 cup yogurt
2 teaspoons vanilla extract
1 3/4 cups flour
1 teaspoon baking soda
1 teaspoon baking powder
1 teaspoon ground cinnamon
1/2 teaspoon salt
1/4 cup milk
3 small apples

Vanilla Cream Glaze:
1 cup confectioners’ sugar
3 Tablespoons heavy cream
1/2 teaspoon vanilla extract

First, make the crumb topping. In a medium bowl, combine both sugars, the cinnamon, and melted butter then stir in the flour. Set aside. Preheat oven to 425 degrees. Line a muffin tin with paper liners. Prepare apples by coring, peeling and dicing into bite sized pieces. In a medium bowl beat the butter on high speed until smooth and creamy, about 1 minute. Add the brown sugar and granulated sugar and beat on high until creamed, about 2 minutes. Add the eggs, yogurt, and vanilla extract and mix well. In a large bowl, toss together the flour, baking soda, baking powder, cinnamon, and salt. Pour the wet ingredients into the dry ingredients and slowly whisk together. Add the milk, gently whisking. Fold in the apples. Fill muffin tins 3/4 full with batter then sprinkle with crumbs (crumble it with your hands to make some big chunks). Bake at 425 for 5 minutes, then reduce heat to 350 and continue baking for an additional 10-15 minutes, or until lightly browned. To make the glaze, whisk all of the glaze ingredients together (add a little milk if it is too thick) and drizzle over warm muffins.

Source | Sally’s Baking Addiction

Original post here

Also shared at:

What'd You Do This Weekend
Link up your recipe of the week

tell 'em tuesday

{no-bake} Peanut Butter Oat Bars

Sometimes my kids live in the same pajamas for three days straight during school holidays. Sometimes I use the bottom of their shirt to wipe their nose. Sometimes I lock my self in the bathroom and sit on the toilet seat scrolling through instagram. And once my son played minecraft for like 6 hours straight. There are plenty of times that I fall short when it comes to being a good mom, but one thing I really make an effort at is after school snacks.  I love having that time with all my little chickens gathered around the table telling me about their day.  And the better the snack, the longer they’ll stay. Some days I don’t always have time to bake something fabulous, so it’s days like these that snacks like this come in handy. 3 ingredients and 3 minutes. That’s all it takes to make these delicious little protein and fiber rich snack bars. And I’ve got a captive audience for at least 15 minutes while they tell me all about who has a crush on who, and who got detention, and how they did on their test and about that darn cat that keeps sneaking into kindy. Priceless.

Three ingredients and three minutes is all it takes to make this delicious snack!
Combine the peanut butter and honey in a microwave safe bowl and heat for one minute. Stir and then continue heating for 30 second intervals, stirring in between each, until smooth and melted.

Three ingredients and three minutes is all it takes to make this delicious snack!
Add oats and stir to combine, then press into prepared pan (or you can roll them into balls, if you prefer).

Three ingredients and three minutes is all it takes to make this delicious snack!
You can cut into squares and eat immediately, but they taste better if they are refrigerated until set. Store leftovers in fridge.

Three ingredients and three minutes is all it takes to make this delicious snack!
1 cup peanut butter
½ cup honey
3 cups rolled or wholegrain oats

Line a 9×9 pan with foil and spray lightly with non-stick spray. Combine the peanut butter and honey in a microwave safe bowl and heat for one minute. Stir and then continue heating for 30 second intervals, stirring in between each, until smooth and melted. Add oats and stir to combine, then press into prepared pan (or you can roll them into balls, if you prefer). You can cut into squares and eat immediately, but they taste better if they are refrigerated until set. Store leftovers in fridge.

Source | Cookies and Cups

{healthy} Banana Cream Pie Smoothie

I love my sister. Well, I love all 5 of my sisters, but I’m especially close with Janessa who is exactly one year and four days older than me. We didn’t always get along, you know the cliche teenage years fighting over clothes and boys (and one epic pop-tart fight), but now that we have grown up and I’ve forgiven her for taking my favorite plaid shirt to college with her, it absolutely kills me to be all the way on the other side of the world from her. Our bi-monthly skype sessions just don’t cut it. But I love that she has started a food blog too, there’s just something about making her recipes and knowing that she made the same thing in her kitchen that just makes me feel close to her.  And it helps that every recipe of hers that I’ve tried has been nothing short of amazing. When she posted this recipe a little while ago I know it would be an instant hit. I mean, she had me at Banana Cream Pie Smoothie. I would have made it even if it did have like 500 calories, but the fact that it’s pretty healthy is just an added bonus. It really is just as good as she claimed it would be. The rich flavor makes me think I should feel guilty, but with natural sweeteners (okay, unless you splurge and go with the vanilla wafers and a dallop of whipped cream on top, which are both optional but for all intents and purposes, you MUST include them 🙂 ), it’s okay to slurp this one down guilt free. Bottoms up!

This Banana Cream Pie Smoothie isn't just delicious, it's HEALTHY too!!

2 bananas, sliced and frozen (make sure they are frozen before hand to get that creamy texture)
1/3 cup low-fat vanilla Greek yogurt
2 teaspoons vanilla extract
1 1/2 cups vanilla almond milk
4 vanilla wafer cookies (optional-we don’t have vanilla wafers here so I used graham crackers that my sweet husband brought back all the way from the States)
1 1/2 tablespoons honey
1/4 teaspoon nutmeg
1/2 teaspoon ground cinnamon
6 ice cubes (more or less to fit your desired consistency)
Whipped cream (to garnish)

*Makes one smoothie

Directions:
Throw all ingredients in the blender. Blend thoroughly until smooth and creamy. Top with dollop of whip cream and crushed graham cracker or vanilla wafer, if desired. Serve immediately.

Source | Six Little Chefs